Derek Tickner
© 2016 Derek Tickner

Simple Sea Shots
Derek Tickner explains how he took a radical approach to surfing and underwater photography with an unusual technique and an inexpensive camera.
To take photographs in the surf or underwater, you can splash out on a purpose-
Waterproof camera housings range in price from $200 to hold digital compacts (which allow you to shoot only on automatic) up to $4000 for SLR housings, which let you have full control underwater. Quality viewfinder waterproof cameras start from around $500 and go up to…well, the sea’s the limit.
However, there is a third and much cheaper option for taking photos in the sea. You can use a disposable or basic reusable waterproof 35mm film camera, priced from $20 to $40.
The downside of these cheap and cheerful cameras is that their prints have a washed out and vaguely blurry look, due to their small, simple lenses. But if you scan the prints and process the digital files in editing software such as Photoshop, you can create colourfully vibrant images.
As in other fields of photography, good equipment can improve the technical quality of a photograph. However, the emotional impact of a picture comes from its composition and subject. It’s not about your gear, but the image the photographer is capable of seeing and then creating, with whatever camera that is to hand.
Hopefully this article will inspire you to dip your toe in the waters of sea photography. In the ocean, you’re literally immersed in a different environment. And if you lose enthusiasm, you haven’t made a large financial commitment.
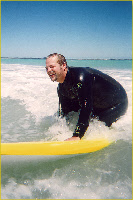
Photographing family and friends is a delight in the sea: once tempted to take the plunge, they (usually) have a ball. The excitement of the location produces natural laughter and smiles.
I’ve always lived by the sea, and ever since I can remember I’ve been fascinated by waves. As a photographer I’ve captured them from the shore in their in all their wavey forms. Being immersed in the surf gives you a totally new perspective.
I also surf, and so have many surfing photos taken from the beach. This usually involves
a 200mm lens, which can shoot spectacular images, but also give a remote feel. Taking
photos close up in the water gives a sense of immediacy: the waves appear much bigger
when you’re semi-
The other main use of underwater cameras is to photograph fish and other denizens of the deep. The photographer needs to be an experienced scuba diver or, at the very least, a good snorkeller. Problems arise with the light as you descend further from the surface. Luminosity decreases rapidly with depth, as do contrast and colour. The red and orange in sunlight are absorbed more by water, giving subjects a blue/green tinge, though this can be overcome by using flash.
The topic of deeper underwater photography is complex, and needs a separate article to do it justice. So I’ll be covering how to photograph waves, surfers and people floating in the shallows, using a simple reusable waterproof camera.
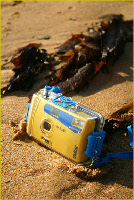
The Camera
Kodak, Fuji and other companies sell disposable waterproof cameras (pre-
The Mariner is a typical plastic, reusable underwater 35mm camera. It has a 28mm lens (with a diameter of just 10mm), shoots at 1/125 second and the aperture is f/9. Depth of field is 1.2m to infinity on land, 1.5m to 3.5 m underwater. All these parameters are fixed.
One advantage of this is that you’re not distracted by fiddling with any settings when you’re in the water. This is just as well, as your concentration is focused on the dual necessity of getting good composition while trying to avoid being pounded by a breaking wave.
Film loading, advance and rewind are manual. I needed to check the instructions to remind myself about handling film: like most photographers today, I’ve been spoilt by auto load/rewind and, with my digital camera, no film at all.
The brittle looking camera body is protected by a basic (but sturdy) clear plastic
housing. The only controls you can use when the case is clamped shut are the shutter
release and film advance. There’s also a built-
It’s best to do a couple of test shots on land to get a feel for the shutter and film advance. Underwater or in the surf, you can’t hear the click of the release and it’s not a positive response on your finger, so press hard to make sure. And always wind on immediately after every shot: Murphy’s Law dictates that the moment you’re perfectly positioned to take the money shot of your mate surfing towards you, you’ll press the button and nothing will happen!
Safety First
It goes without saying that you need to be a strong and confident swimmer before taking the plunge in surf. If you’re a poor swimmer, you can still take some fun shots of the kids messing around on boogie boards in the shallows between the flags, or take floating people pics on calm days.
Wear a wetsuit if the water’s cold. You tire much more quickly once your body temperature drops. I strongly recommend using a body board and flippers; you can move around more rapidly, it provides an (admittedly wobbly) platform for the camera and you can catch a wave in when you’ve finished. Most importantly, it provides floatation if you get into difficulties.
Experienced surfers use rips to get out the back (past where the waves are breaking) with minimal pounding. If you’re unfamiliar with the beach and its rips, treat with extreme caution! Always be aware of your relative position to the beach: make a note of a landmark where you head out.
Rips are usually (but not always) areas of still water. If you do get in trouble, never try and swim against the rip back to the beach, you’ll soon get exhausted and be in serious trouble. Swim parallel to the beach away from the rip, then swim in through the breaking waves. It may look scary, but the waves will help push you in. Of course, on a body board you can surf back to the beach in seconds. If you can’t get back ashore, don’t panic and waste energy, hold one arm above your head. This is the sign of being in distress.
Waves vary in size and shape, their power increases with height and the steepness of the beach. A steeply shelving shoreline produces powerful dumpers; even fairly small waves can throw you onto the sand with considerable power. Surfers have broken their necks and backs by landing badly.
If a wave is about to break on top of you, take a deep breath and dive deep; the deeper you are, the safer you are. If you get caught in the turbulence you get tumbled and disorientated, it’s like being in a giant washing machine.
Don’t fight it, wait until the white water has passed, open your eyes to work out which way up you are and swim for the surface. If you feel yourself being ‘sucked over the falls’ (the wave picks you up just as it’s breaking and slams you down), quickly roll into a ball with your elbows over your head.
If in doubt, don’t go out! Wait for better conditions. For more advice, visit the Surf Life Saving Australia’s beach safety page: www.slsa.com.au/default.aspx?s=beachsafety
When to Go
Head for the beach when the conditions are right for the photos you’re planning. For underwater people shots a calm day is best. The size and direction of the swell and wind will determine whether the waves will be aesthetically pleasing.
No wind or light offshore breezes are better: the waves take longer to peak, and the smoother water is more photogenic. Onshore winds create ripples which mess up the sea’s surface, and the tops of the waves tumble over without peaking.
Sunlight is essential. Overcast days give a gloomy light underwater, and above water shots lack colour.
Checking the forecasts can save a wasted trip to the beach. For surf, visit www.swellnet.com.au. For the marine forecast, visit www.bom.gov.au/marine/forecasts.shtml.
Photographing People
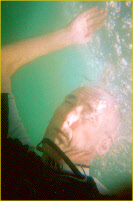
Choose a calm day to get pictures of people floating. As with landscapes, early morning and late evening are best, there’s more red in the light, so you can minimise that washed out look to your photos. Get your subject to use their weightlessness to come up with poses that would be impossible on land. Take a deep breath, duck under and shoot.
I use swimming goggles in calm water, you can clearly see your subject through the small viewfinder. Without goggles, everything is disorientatingly blurry and you won’t have much idea of what you’re photographing.
Underwater, available light falls off rapidly with distance. The camera has a wide angle lens, so your subject will be a small and indistinct blob in the gloom if you’re more than five metres away. So fill the frame, either with their body or a head shot. Ask your subject to try and keep their eyes open. To emphasise the watery medium, get them to blow bubbles or let any long hair float limpidly. The follicly challenged can use seaweed as an impromptu wig.
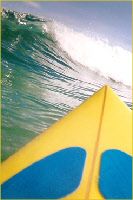
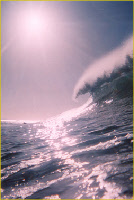
Photographing Waves
From the beach, study where the waves are breaking and where the rips are situated.
My aim is to capture a wave just as the lip tumbles over, so the wave wraps around
over the top of the frame. Stay low, with the camera centimetres above the surface,
to dramatically heighten the appearance of the wave. If there’s no-
Quickly get the shot, then dive seaward into the smooth shoulder of the wave, to avoid getting ‘sucked over the falls’ (refer to the safety tips).
On the east coast, early morning sun gives vivid photos of green translucent waves, as the light shines from behind the waves. An evening session throws a warm light onto the face of the waves and any surfers. A light offshore wind blows spray back off the breaking wave’s lip, and can make for an atmospheric image.
Flare on the lens will be a dilemma if shooting into the sun. You can try and shield
the lens with one hand, which, admittedly, is easier said than done when treading
water in the surf. I don’t usually worry about flare, figuring that it all adds to
the sense of being there. Indeed, flare and glare can be emphasised to good (and
debatably artistic) effect in Photoshop.
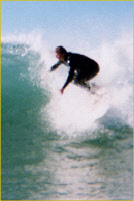
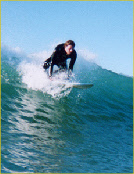
Photographing Surfers
Surfers spend most of their time bobbing around out the back, waiting for the right wave. A photographer needs to be patient. When the action happens, it happens fast. Anticipation is the key, you need to be in the right spot to get the shot. With the camera’s wide angle lens, without the luxury of a zoom, you need to be as close as is safe to the surfer.
Only go out with friends you can trust as good surfers. Novice surfers have little control of their board, which can become a lethal projectile when it’s flying towards your head. Peering through the tiny viewfinder, you won’t see it coming until too late. Professional surf photographers wear a crash helmet for good reasons.
Look for where your surfer mates are taking off and position yourself on the unbroken side of the peel, about ten metres inshore from the point where it breaks. Your mates will love to show off their radical moves for the camera.
Keep out of the way of other surfers, on crowded breaks ‘surf rage’ can rear its ugly head. If you have to hang back further from the action than you’d like, you can still shoot away: when you scan the prints later at high resolution, you can crop in on the action.
Don’t get carried away with the thrill of it all and waste shots, wait until you have a photo that’s worth taking. Once the film runs out, it’s a long and tiring paddle back to the beach to change the roll.
Processing in Photoshop
Because of the basic nature of the camera, the prints you get back are often disappointing in their bleary blandness, especially if you’re used to crisp, colourful photographs from your usual camera. If you haven’t embraced the digital age, you can alleviate this problem to some extent by using a colour saturated negative film like Agfa Ultra. Or you can ask the folks at your D&P shop to pump up the contrast and colour when they make your prints and crop the reprints.
If you have photo editing software you can do this yourself, with much more creative control. I scan my 6 x 4 inch prints at a minimum of 600 dpi in 24 bit colour, so I’ll have acceptable quality for enlargements or if I need to do some major cropping.
Five steps to producing dynamic images from the initial prints:
1. Crop the photo to achieve a pleasing balance and to focus the viewer’s attention on the main subject. Often large areas of the sky and sea can be lost to improve the picture.
2. Pump up the contrast and adjust the brightness, preferably with the Levels command to expand the dynamic range of the image using the histogram. For a simple tutorial on the use of Levels, visit www.shortcourses.com/how/histograms/histograms.htm.
3. Adjust the colour and hue. Unless I’m going for a monotone effect, I increase the saturation of all or some of the colours, and sometimes adjust the hue to shift the colours more into the reds.
4. Sharpen the photo as much as practical without distortion, unless the blurriness adds to the desired “action” effect.
5. If so inclined, experiment with dodging, burning or blurring on parts of the photo, and try various filters for artistic effect. Use in moderation, unless you’re after a totally “over the top” final image.
Dipping into the briny launches you into a new photographic environment, one that’s both challenging and inspiring. Cheap waterproof cameras have their technical limitations, but these restrictions can be turned to your advantage. Your creative juices start to flow: your sea photographs are limited only by your imagination.
And best of all, it’s great fun.